Suture Technique
David Ray Velez, MD
The Operative Review of Surgery. 2023; 1:93-102.
Table of Contents
Interrupted Techniques
General Thoughts
- May Allow Better Immediate Approximation of Skin and Fascia
- Greater Tensile Strength
- Less Risk of Injuring Cutaneous Circulation
- Can Remove Single Sutures in the Case of Infection
- Slower to Perform
Types
- Simple Interrupted (“Baseball Stitch”)
- Horizontal Mattress
- Vertical Mattress
- Deep Dermal
- Interrupted Subcuticular
Simple Interrupted (“Baseball Stitch”)
- Most Fundamental Technique in Surgery
- Technique:
- First, Pierce Skin Perpendicularly 4-8 mm from the Edge and Release Internally in the Dermis
- Next, Pierce Tissue Internally in the Dermis on the Opposite Side and Release Externally 4-8 mm from the Edge
- Tie Knot Externally, Lying to One Side to Avoid Overlying the Wound
- Easy to Perform and Strong
Horizontal Mattress
- Technique: 2
- First, Pierce Skin Perpendicularly 4-8 mm from the Edge and Release Internally in the Dermis
- Next, Pierce Tissue Internally in the Dermis on the Opposite Side and Release Externally 4-8 mm from the Edge
- Then, Advance 4-8 mm Along the Wound and Pass the Needle Back in a Reverse Manner, Ending on the Original Side that Started
- Tie Knot Between the Two Ends – Tied Gently to Avoid Tissue Strangulation
- Minimizes Tension by Spreading Along the Length
- Good for Fragile Tissue
- Can Cause Strangulation and Hypoxia at the Tissue Edges
- Can Place a “Bolster” or Compressible Cushion Under the Suture Loop to Minimize Risk (Gauze and Plastic Tubing Commonly Used)
Vertical Mattress
- Technique (“Far-Far, Near-Near”): 3
- First, Pierce Skin Perpendicularly 4-8 mm from the Edge and Release Internally in the Deep Dermis
- Next, Pierce Tissue Internally in the Deep Dermis on the Opposite Side and Release Externally 4-8 mm from the Edge
- Then, Pierce the Skin on the Same Side (Opposite the Starting Side) 1-2 mm from the Edge and Release Internally in the Upper Dermis
- Finally, Pierce Tissue Internally in the Upper Dermis on the Opposing Side (Starting Side) and Release Externally 1-2 mm from the Edge
- Tie Knot Between the Two Ends – Tied Gently to Avoid Tissue Strangulation
- Maximizes Eversion
- Minimize Tension
Deep Dermal
- Essentially a Simple Interrupted Suture Only in the Dermis with a Buried Knot
- Used to Reduce Tension Prior to Skin Approximation
Interrupted Subcuticular
- Technique (“Deep-to-Superficial, Superficial-to-Deep”): 4
- First: Pierce the Tissue Internally from a Deep Position and Release Internally Just Below the Skin Edge, Superficial to the Entrance
- Next: Pierce the Tissue Internally on the Opposite Side Just Below the Skin Edge and Release from a Deeper Position
- Tie Knot Between the Two Ends – Take Care to Avoid Crossing the Ends on Opposite Sides (Knot Will End Superficially and Irritate the Wound Rather than Bury as Intended)
- Approximates Edges to Enhance Cosmetic Results
- Minimal Strength – Should Not Be Under Any Tension
- *Multiple Variations Exist Outside of the Traditional “Halsted’s Buried Suture” as Described with Varying Complexity and Strength 5
- Often Used to Close Laparoscopic/Robotic Port Sites

Interrupted Suture Techniques: (A) Simple, (B) Horizontal Mattress, (C) Vertical Mattress 1
Subcuticular Suture 1
Continuous (Running) Techniques
General Thoughts
- Faster to Perform
- Spread Tension Across the Repair
- Lower Point Tensile Strength
- Higher Risk of Injuring Cutaneous Circulation
- In Case of Dehiscence, the Entire Length of Suture Unravels
Outcome Comparison to Interrupted Suture
- For Skin Closure:
- Better Cosmetic Outcome 6
- Lower Risk of Superficial Dehiscence (Odds Ratio: 0.16) 6,7
- No Difference in Surgical Site Infection Rates 6
- For Fascial Closure:
- Some Studies Propose a Lower Risk of Fascial Dehiscence but it is Debated with No Good Evidence 8-10
- When Performing Continuous Fascial Closure with Slowly Absorbable Suture, Small Bites Lower Risk of Hernia than Large Bites 10,11
Types
- Simple Running (“Whip Stitch”)
- Running Locked (Ford Interlocking, Reverdin, Multanovski)
- Running Horizontal Mattress
- Running Subcutaneous
- Running Subcuticular
Simple Running (“Whip Stitch”)
- Technique:
- Start with a Single Simple Interrupted Suture at One End to Anchor the Suture and Cut One End
- Use the Other End to Continually Pass Additional Throws, Advancing 4-8 mm per Bite
- At the Wound End, Tie the Free Suture End to the Prior Suture Loop
- Less Risk of Scarring
- Faster for Long Repairs
Running Locked (Ford Interlocking, Reverdin, Multanovski)
- Technique:
- Similar to a Simple Running Suture
- Each Additional Throw is Passed Under the Last Loop Prior to Advancing to “Lock”
- Allows Each Throw More Independence
- Good for Long Laceration with a Slight Curve
Running Horizontal Mattress
- Allows Additional Wound Eversion
- Better Cosmetically than an Interrupted Horizontal Mattress
- Poorer Wound-Edge Approximation than Other Running Techniques – May Leave a Small Gap
Running Subcutaneous
- Essentially a Simple Running Suture Only in the Subcutaneous Tissue
- Used to Reduce Tension Prior to Skin Approximation
Running Subcuticular
- Technique:
- Anchor Suture at the End Using a Deep Dermal Stitch and Cut One End
- Pass the Stitch in Reverse from Deep to Superficial, Exiting at the Wound Apex
- Staying within the Dermis/Epidermis, Pierce the Internal Tissue at the Apex and Advance 4-8 mm
- Pierce the Dermis/Epidermis on the Opposite Side, Directly Across from Where the Prior Throw Exited, and Advance another 4-8 mm
- Continue Advancing Along the Wound Length
- Tie at the End Using Either a Square or Aberdeen Knot and Bury the Stitch
- Approximates Edges to Enhance Cosmetic Results
- Requires Less Suture Material than Interrupted Subcuticular Sutures – Less Foreign Body Reaction
- Minimal Strength – Should Not Be Under Any Tension

Running Suture Techniques: (A) Simple, (B) Locked, (C) Horizontal Mattress, (D) Subcuticular 1
Edge-Inverting Techniques
Theory
- “Edge-Eversion” Adds Additional Tissue to Theoretically Allow the Final Scar to Lay Flat as the Healing Wound Contracts – No Data to Support 12
- Some Consider “Edge-Inversion” to Better Seal the Repair from Leaking Fluid and Minimize Exposed Suture/Resulting Adhesions
- Often Used to Repair Hollow Organs/Bowel
- Often Used as a “Second Layer” in Bowel Anastomosis
Types
- Lembert Suture
- Halsted Suture (Interrupted Quilt)
- Cushing Suture
- Connell Suture
Lembert Suture
- Inverts Edges to Close Hollow Organs
- Should Use Interrupted Seromuscular Bites
- Does Not Involve Mucosa with Low Risk of Contamination
- Too Shallow of Bites Can Cause Serosal Tears
- Can Produce Mild Stenosis of Bowel
Halsted Suture (Interrupted Quilt)
- Combination of Lembert Sutures Done in a Horizonal Mattress Fashion
- Minimizes Tension by Spreading Along the Length
Cushing Suture
- Running Technique with Bites Placed Parallel to the Edge to Advance
- Should Use Running Seromuscular Bites
- Bites Do Not Penetrate the Lumen
Connell Suture
- Running Technique with Bites Placed Parallel to the Edge to Advance
- Should Use Running Full Thickness Bites
- Bites Do Penetrate the Lumen
- Mnemonic Used for the Technique: “Go into the Bar then Out of the Bar, Then Cross the Street and Repeat”
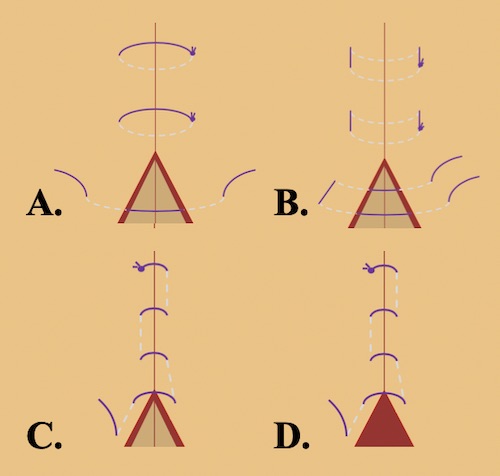
Edge-Inverting Techniques: (A) Lembert, (B) Halsted, (C) Cushing, (D) Connell 1
Other Specialized Techniques
Brooke Suture
- Technique Used to Mature an Ileostomy
- Everts Mucosa Full-Thickness & Avoids Serosal Exposure to Stoma Output
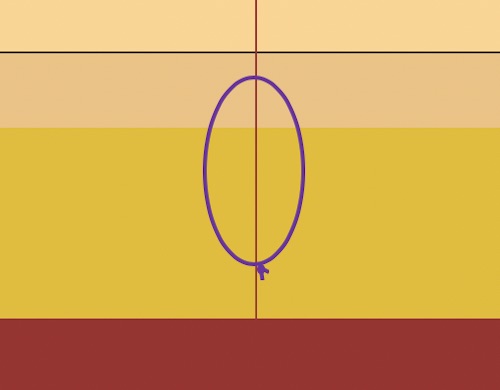
Purse-String Suture
- Bites Advanced Circumferentially Around A Round Defect
- Used to Close a Hollow Organs or Round Hole
Figure-of-Eight Suture
- Technique:
- A Single Interrupted Suture is Placed
- Rather than a Knot, A Second Throw is Placed 4-8 mm Away in the Same Direction
- Tie Knot Between the Two Ends (Forms an “8” Shape)
- Commonly Used for Bleeding Vessel Ligation
- Also Used to Add Strength to a Repair and Help Decrease Tension Across a Wound
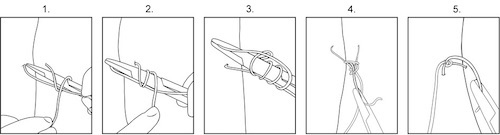
Suture Ligation (“Stick-Tie”)
- Technique:
- A Bleeding Vessel is Clamped with a Right-Angle Forceps
- The Stitch is First Passed Through the Center of the Vessel Under the Clamp
- A Single Knot is Placed on One Side Under the Clamp
- The Ends are Then Passed Around Under the Clamp and the Remaining Knots are Placed on the Opposite Side
- Used to Control Bleeding Vessels
- Initial Pass Through the Vessel Theoretically Prevents the Knot from Falling Off as Opposed to a Simple “Tie-On-A-Pass”
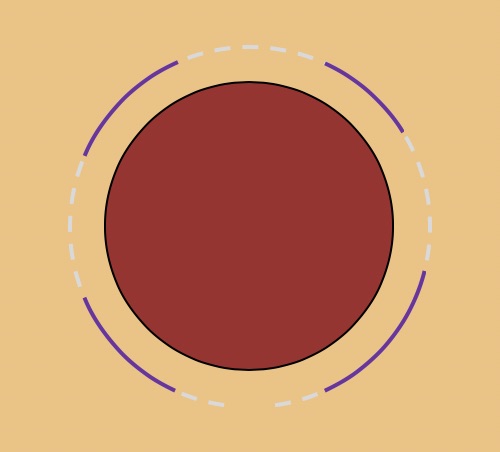
Purse-String Suture 1
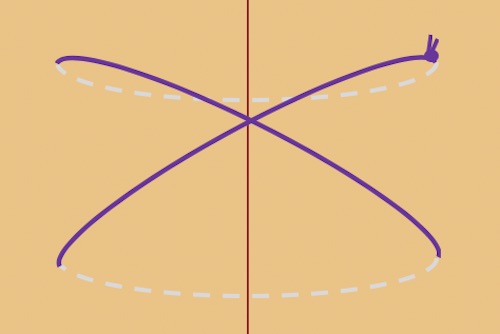
Figure-of-Eight Suture 1
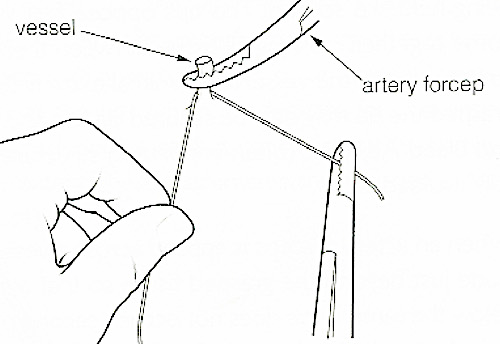
Suture Ligation 13
Suture Selection
Suture Properties
Needle Properties
Permanent Suture Removal Timing
- Face: 3-5 Days
- Neck: 7 Days
- Scalp: 7-10 Days
- Trunk: 10-14 Days
- Arms: 10-14 Days
- Legs: 14-21 Days
Knots
Square Knot
- Most Basic Surgical Knot
- Two Throws in “Opposite Directions”
Surgeon’s Knot
- Initial Throw is Pulled Through Twice
- Second Throw in Opposite Direction
- More Stable than a Square Knot
- Often Does as the First Knot and Additional Throws Placed as Square Knots Above it
Granny Knot
- Two Throws in the Same Direction
- Typically Referred to as Poor Technique and Done Unintentionally
- Not as Strong as Square Knot – Can Slip
Surgical Slip Knot (Double Half-Hitch)
- Keeping Tension on One End the Initial Knot is Thrown Twice in the Same Direction and then Pulled Tight
- Essentially a “Purposeful” Granny Knot
- Following Throws in Opposite Directions to Lock
- Allows Initial Tightening of the Knot to Ensure Tightness
- Sliding Knot Variations:
- Duncan Loop
- Tennessee Slider
- Roeder’s Knot
- Weston Knot
- Samsung Medical Center (SMC) Knot
Aberdeen Knot
- Self-Locking Finishing Knot Often Used to Complete a Running Subcuticular Suture
- Technique:
- The Suture End is Repeatedly Partially Pulled Through the Prior Loop to Form a New Loop (“Throws”)
- The Final Suture End is Pulled Completely Through the Final Loop (“Turns”) and Pulled Tight to Lock the Knot
- The Single Remaining Suture End is Then Buried
- “Ultimate Knot”: Throws + Turns
- 3+2 or 4+1 15,16
- Previously Recommended 6+1
- Benefits Over a Square/Surgeon’s Knot: Stronger, More Secure, and Uses Less Suture for a Foreign Body Reaction 17
Forwarder Knot
- Sliding Self-Locking Starting Knot Used to Begin a Running Suture
- Technique:
- Hold Both the Needle Driver and Free End of the Suture in the Same Hand
- Wrap the Working End of the Suture Around Both the Needle Driver and Free Suture End Three Times
- Grab the Working End of the Suture with the Needle Driver and Pull Through the Knot
- Pull Both Suture Ends in Opposite Direction to Lock and Tighten the Knot
- Benefits Over a Square/Surgeon’s Knot: Stronger, More Secure, and Uses Less Suture for a Foreign Body Reaction 17
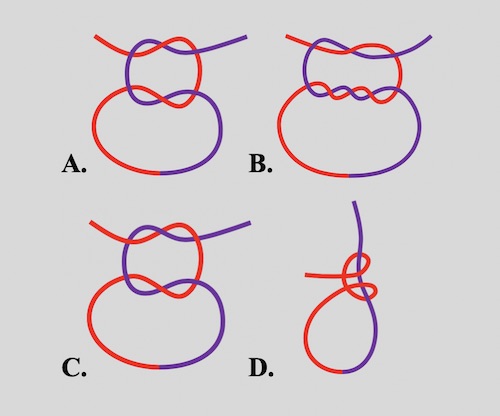
Surgery Knots: (A) Square, (B) Surgeon’s, (C) Granny, (D) Slip Knot 1
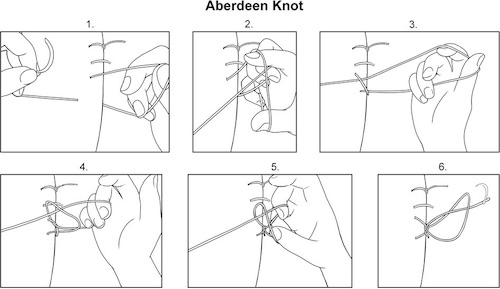
Aberdeen Knot 14
Forwarder Knot 14
Needle Handling
Holding the Needle
- Hold the Needle in the Middle to 2/3 of the Way Back on the Needle
- With the Needle at a 90-Degree Angle to the Holder (Possibly Up To 135-Degrees in Certain Contexts)
- Hold the Needle at the Tip of the Needle Holder
Needle Handling
- Direction:
- Wound is Parallel to the Operator: Suture Toward Yourself
- Wound is Perpendicular to the Operator: Suture Right-to-Left (Left-to-Right if Left-Handed)
- Enter Tissue at a 90-Degree Angle
- Advance Needle by Rotating the Hand/Needle-Driver Rather Than “Pushing” the Needle
Needle Holders
Characteristics of an Ideal Wound Closure 18
- Technically Simple and Fast to Perform
- Maintains Tensile Strength Throughout the Healing Process
- Allows Precise Wound Edge Approximation without Leaving Suture Marks
- “Approximate, Don’t Strangulate”
Correct Needle Handling 1
References
- Velez DR. Suture Technique. The Operative Review of Surgery. 2023.
- Coldiron BM. Closure of wounds under tension. The horizontal mattress suture. Arch Dermatol. 1989 Sep;125(9):1189-90.
- Davis JS. The On-End or Vertical Mattress Suture. Ann Surg. 1933 Nov;98(5):941-51.
- Halsted WS, III. The radical cure of inguinal hernia in the male. Ann Surg1893;17:542–56.
- Zhang W, Xie J, Zeng A. The Origin and Development of Interrupted Subcuticular Suture: An Important Technique for Achieving Optimum Wound Closure. Dermatol Surg. 2022 Jun 1;48(6):619-624.
- Luo W, Tao Y, Wang Y, Ouyang Z, Huang J, Long X. Comparing running vs interrupted sutures for skin closure: A systematic review and meta-analysis. Int Wound J. 2023 Jan;20(1):210-220.
- Gurusamy KS, Toon CD, Allen VB, Davidson BR. Continuous versus interrupted skin sutures for non-obstetric surgery. Cochrane Database Syst Rev. 2014 Feb 14;(2):CD010365.
- Gupta H, Srivastava A, Menon GR, Agrawal CS, Chumber S, Kumar S. Comparison of interrupted versus continuous closure in abdominal wound repair: a meta-analysis of 23 trials. Asian J Surg. 2008 Jul;31(3):104-14.
- Patel SV, Paskar DD, Nelson RL, Vedula SS, Steele SR. Closure methods for laparotomy incisions for preventing incisional hernias and other wound complications. Cochrane Database Syst Rev. 2017 Nov 3;11(11):CD005661.
- Henriksen NA, Deerenberg EB, Venclauskas L, Fortelny RH, Miserez M, Muysoms FE. Meta-analysis on Materials and Techniques for Laparotomy Closure: The MATCH Review. World J Surg. 2018 Jun;42(6):1666-1678.
- Deerenberg EB, Harlaar JJ, Steyerberg EW, Lont HE, van Doorn HC, Heisterkamp J, Wijnhoven BP, Schouten WR, Cense HA, Stockmann HB, Berends FJ, Dijkhuizen FPH, Dwarkasing RS, Jairam AP, van Ramshorst GH, Kleinrensink GJ, Jeekel J, Lange JF. Small bites versus large bites for closure of abdominal midline incisions (STITCH): a double-blind, multicentre, randomised controlled trial. Lancet. 2015 Sep 26;386(10000):1254-1260.
- Kappel S, Kleinerman R, King TH, Sivamani R, Taylor S, Nguyen U, Eisen DB. Does wound eversion improve cosmetic outcome?: Results of a randomized, split-scar, comparative trial. J Am Acad Dermatol. 2015 Apr;72(4):668-73.
- Wikimedia Commons. (License: Public Domain)
- Malone E. Knots – Forwarder and Aberdeen. Large Animal Surgery – Supplemental Notes. (License: CC BY-NC 4.0)
- Schaaf O, Glyde M, Day RE. A secure Aberdeen knot: in vitro assessment of knot security in plasma and fat. J Small Anim Pract. 2009 Aug;50(8):415-21.
- Stott PM, Ripley LG, Lavelle MA. The ultimate Aberdeen knot. Ann R Coll Surg Engl. 2007 Oct;89(7):713-7.
- Gillen A. Evaluation of the Aberdeen and Forwarder Knots in Large Gauge Suture. Auburn, AL. 2016.
- Moy RL, Waldman B, Hein DW. A review of sutures and suturing techniques. J Dermatol Surg Oncol. 1992 Sep;18(9):785-95.