
Transabdominal Preperitoneal (TAPP) Repair
Transabdominal Preperitoneal (TAPP) Repair
David Ray Velez, MD
Definition
Definition: A Minimally Invasive Posterior Mesh Repair Performed by Entering the Peritoneal Cavity, Creating a Peritoneal Flap, and Placing a Mesh in the Preperitoneal Space
Become the Most Common Technique for Robotic Inguinal Hernia Repair
Repairs Both Inguinal Hernias and Femoral Hernias
See Also:
*See Inguinal Hernia
*See Femoral Hernia
*See Inguinal Hernia Repair (IHR)
*See Totally Extraperitoneal (TEP) Repair
Inguinal Anatomy/Laparoscopic Triangles: *See Abdominal Wall: Anatomy
Technique
Establish Pneumoperitoneum and Place Ports
- 10-12 mm at Umbilicus (Camera Port)
- 5 mm (x2) 8-10 cm Lateral to Umbilicus on Either Side (Working Ports)
Preperitoneal Exposure and Dissection
- Create a Transverse Peritoneal Flap
- Extend from the Medial Umbilical Ligament to the ASIS
- Begin ≥ 4 cm Above the Deep Inguinal Ring
- Develop the Space of Retzius Medially – Between the Pubic Symphysis and Bladder
- Develop the Space of Bogros Laterally – Lateral from the Inferior Epigastric Vessels to the ASIS
- Obtain the Critical View of the Myopectineal Orifice (MPO)
Repair
- Completely Reduce the Hernia Sac
- Parietalize the Spermatic Cord Structures – Completely Separate the Peritoneum from the Vas Deferens and Gonadal Vessels
- Place a Large Mesh Over the Myopectineal Orifice (MPO)
- Ensure Adequate Circumferential Overlap
- Mesh May Be Left Unfixed or Secured with Tacks, Glue, or Self-Fixating Mesh Depending on Surgeon Preference
Caution: Identify and Avoid Tacks or Sutures within the “Triangles of Danger” (Inferior to the Inguinal Ligament and Lateral to the Vas Deferens)
Closure
- Close the Peritoneal Flap to Completely Reperitonealize the Mesh
- Commonly Use a Running Absorbable Barbed Suture
- Desufflate Under Direct Visualization While Maintaining Mesh Position
- Remove Ports
- Close the Fascial Defect at the 10-12 mm Port Site
- Close Skin
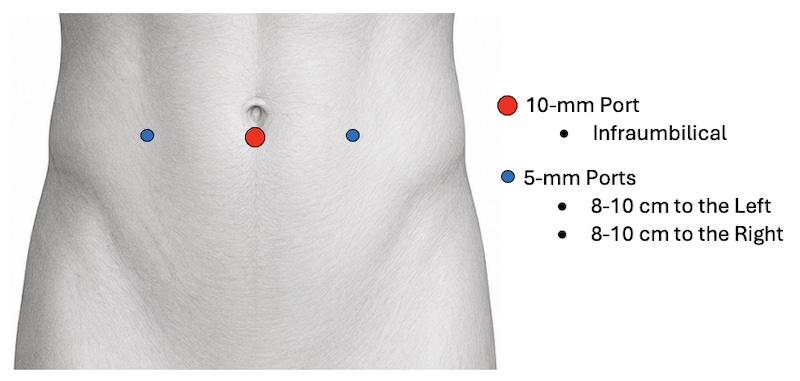
Port Placement
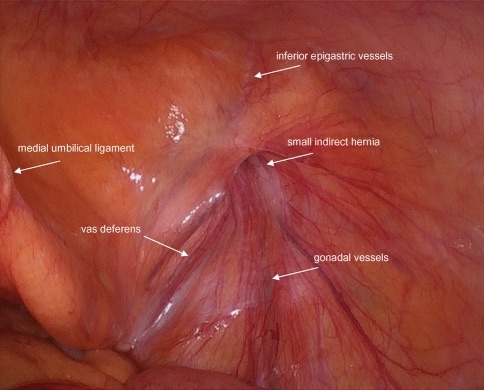
Laparoscopic View of the Inguinal Triangles 1
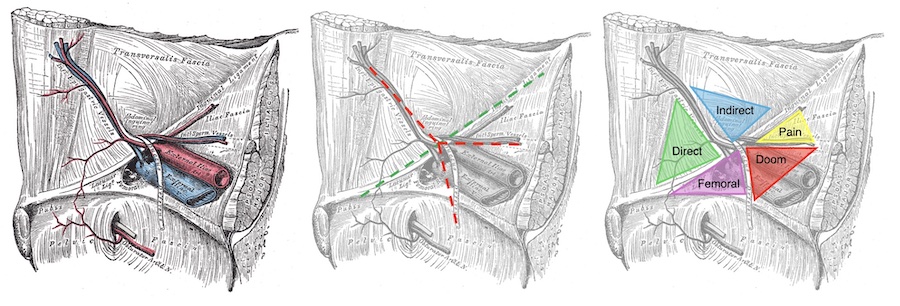
Laparoscopic Inguinal Triangles
Critical View of the Myopectineal Orifice (MPO)
Definition: Complete Exposure of the Myopectineal Orifice (Anatomical Area Viewed) Prior to Mesh Placement During Minimally Invasive Hernia Repair
Similar Concept to the Critical View of Safety in Laparoscopic Cholecystectomy – Although Not Universally Adopted in the Same Way
General Requirements:
- Expose the Pubic Tubercle and Cooper’s Ligament Across the Midline
- Develop the Spaces of Retzius (Medially) and Bogros (Laterally)
- Reduce All Hernia Sacs – Direct, Indirect, Femoral, and Obturator
- Completely Parietalize the Cord Structures
- Reduce Any Cord Lipoma
- Visualize the Psoas Muscle and Iliac Vessels Laterally
- Achieve Complete Hemostasis
- Place a Large Flat Mesh to Cover the Entire Myopectineal Orifice Without Folds or Creases
9 Steps to Establish
- Step 1: Expose the Pubic Tubercle and Cooper’s Ligament Across the Midline
- Step 2: Rule Out a Direct Hernia
- Visualize the Entire Hasselbach Triangle
- Step 3: Develop the Space of Retzius Medially
- Dissect at Least 2 cm Between Cooper’s Ligament and the Bladder
- Facilitates Flat Placement of the Medial Mesh to Avoid Mesh Displacement Caused by Bladder Distention
- Step 4: Rule Out a Femoral Hernia
- Visualize the Femoral Canal Between Cooper’s Ligament and the Iliac Vein
- Step 5: Parietalize the Cord’s Elements
- Completely Separate the Peritoneum from the Cord Structures Until the Cord’s Elements Lie Flat and No Movement of the Cord is Triggered by Pulling the Sac and Peritoneum Upward
- Step 6: Reduce Any Cord Lipomas
- Step 7: Develop the Space of Bogros Laterally
- Extend Beyond the Anterior Superior Iliac Spine (ASIS)
- Step 8: Ensure the Mesh and Any Fixation Lie Above the Inter-ASIS Line
- Avoids Recurrence and Nerve Injury
- Step 9: Place a Large Flat Mesh Only After Complete Dissection and Hemostasis
- Typically ≥ 15 x 10 cm
- Ensure No Creases or Folds
References
- Carter J, Duh QY. Laparoscopic repair of inguinal hernias. World J Surg. 2011 Jul;35(7):1519-25. (License: CC BY-ND-4.0)